目录
列表控件专题
本文介绍五种经典列表场景使用
- 场景一:列表到明细页的传值;
- 场景二:列表的分页效果;
- 场景三:列表的分组效果;
- 场景四:列表左滑时出现的button个数和样式;
- 场景五: 创建列表时动态修改列表里cell的信息
场景一
使用说明:展示列表的绑定数据源和导航到明细页。
步骤:
1、新建页面listsingle,把列表控件拖入设计器,设置绑定字段属性为list。分别拖入三个标签控件,绑定字段分别绑定code、name、price。其中list、code、name、price这些字段在下面的js代码中会有定义。如图: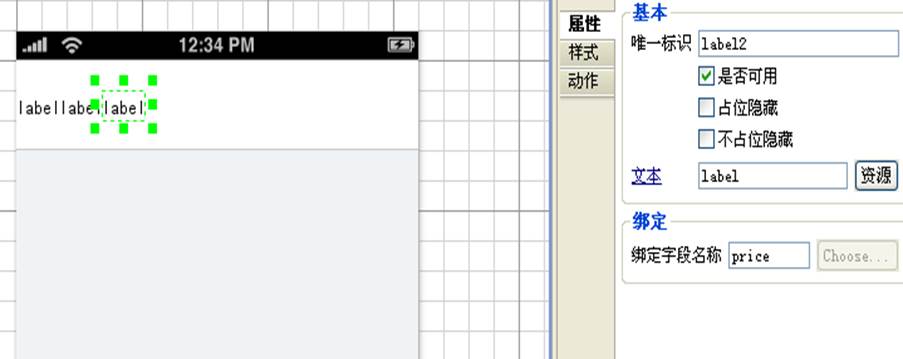
2、列表控件上增加onload事件以便能够加载数据,方法名定为loaddata。如图: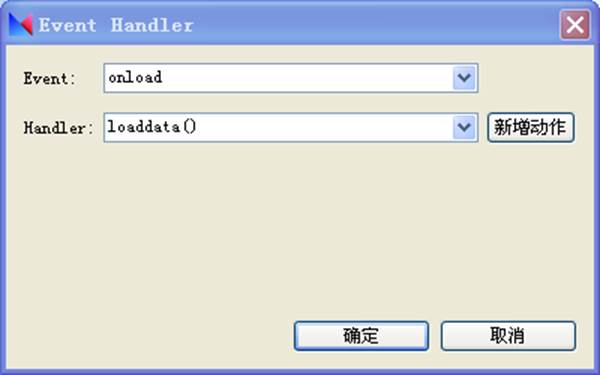
此时生成的DSL为:
<listView id="listviewdefine0" bindfield="list" onload="loaddata()"><div id="panel0"><div id="panel1"><label id="label0" bindfield="code">label</label><label id="label1" bindfield="name">label</label><label id="label2" bindfield="price">label</label></div><div id="panel2"/></div></listView>
3、确定生成代码,在loaddata中加如下代码:
function loaddata(sender, args) {var list = [];for(var i = 0; i <= 20; i++) {var json = {"code" : i,"name" : "商品" + i,"price" : 10 * i};list.push(json);}var json = {list : list};$ctx.push(json);}
4、增加明细页面detail。完成文本框的数据绑定code、name、price。如图:
5、在listsingle页面中的列表控件中标签所在的容器上增加onclick事件。Dsl代码如下:
6、在opendetail方法中编写如下代码:
function opendetail(sender, args) {$view.open({"viewid" : "com.lpsoft.listdemo.Detail", //目标页面(首字母大写)全名,"isKeep" : "true", //保留当前页面不关闭"row" : $id("listviewdefine0").get("row")});}
7、在detail页面增加onload事件并增加如下代码:
Binddata方法:
function binddata(sender, args){var json=$param.getJSONObject("row");$ctx.push(json);}
场景二
功能说明:模拟列表分页的效果。
使用说明:在此基础上,修改列表控件load数据的逻辑并且增加列表上下分页的事件。
步骤:
1、增加列表下翻事件。如图:
2、增加下翻逻辑。
function down(sender, args) {var oldjson = $ctx.getJSONArray("list");var length = oldjson.length;var json = {list : oldjson};for(var i = length; i < length + 20; i++) {var line = {};line["code"] = i;line["name"] = "商品" + i;line["price"] = "$" + i;json.list.push(line);}$ctx.push(json);}
场景三
功能说明:分组效果。
步骤:
1、新建一个新的页面mlist。从组合控件中见分组列表控件拖到页面中。设置绑定字段为list。并且增加onload事件。如图:
2、增加onload逻辑。
注意修改listview背景色,不能为白色
function linedelete(sender, args) {var row = $id("listviewdefine0").get("row");delteRow($stringToJSON(row));}function delteRow(row) {var sourceR = $ctx.getJSONArray("list");for(var i = 0; i < sourceR.length; i++) {var group = sourceR[i];if (group.id == row.id) {sourceR.splice(i, 1);break;}}var json = {};json["list"] = sourceR;$ctx.push(json);}
场景四
功能说明:列表左滑时出现的button个数和样式。
说明:可以随意定义左滑时出现的button个数和样式,imagebutton支持的属性创建button时都支持
设计器上进行如下操作: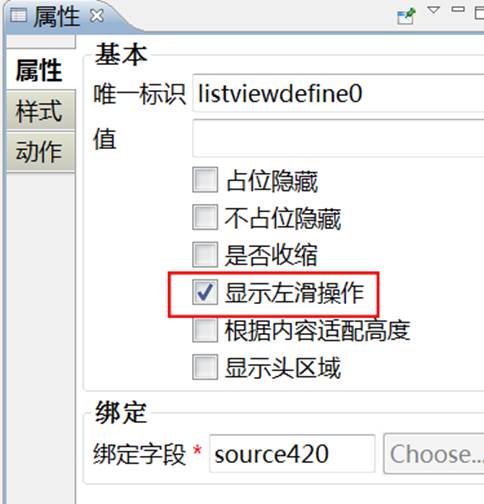
<listView id="listviewdefine0" bindfield="source420" linedelshow="true" onload="this.onload()"><div id="panel0"><div id="panel1"><label id="label0" bindfield="row420">label</label></div><div id="panel2"/></div></listView>
function com$requirements$SlidingitemController$onload(sender, args) {var rightflipper = [{"halign" : "center","text-align" : "right","width" : "70","icon-width" : "12","istogglebutton" : "false","font-pressed-color" : "#ffffff","icon-height" : "12","height" : "59", //与列表行高度相同即可"color" : "#ffffff","layout-type" : "linear","background" : "#FF615A","font-size" : "12","icon-background-image" : "audit_refuse.png","value" : "拒绝","icon-pressed-image" : "audit_refuse.png","font-family" : "default","valign" : "center","checked" : "false","icon-text-spacing" : "8","onclick" : "a()"}, {"halign" : "center","text-align" : "right","width" : "70","icon-width" : "12","istogglebutton" : "false","font-pressed-color" : "#ffffff","icon-height" : "12","height" : "59","color" : "#ffffff","layout-type" : "linear","background" : "#15AD64","font-size" : "12","icon-background-image" : "audit_agree.png","value" : "同意","icon-pressed-image" : "audit_agree.png","font-family" : "default","valign" : "center","checked" : "false","icon-text-spacing" : "8","onclick" : "b()"}];$id("listviewdefine0").set("slidingitems", rightflipper);var json = {source420 : [{row420 : "支持操纵列表cell"}, {row420 : "分组按字母排序"}, {row420 : "laber支持html"}, {row420 : "获取本地联系人所有信息"}, {row420 : "列表左滑用户能自行设置"}]};$ctx.push(json);}function a() {$alert("审核通过");}function b() {$alert("审核不通过");}
效果如下: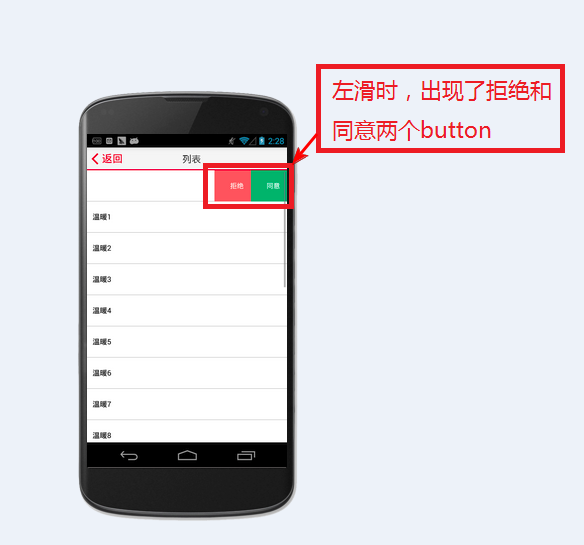
场景五
1、增加onitemcreate事件
<!--列表行创建事件--><listView id="listviewdefine0" bindfield="cell" onitemcreate="myRowCreate()"><div id="panel0"><div id="panel1"><label id="label0">label</label></div><div id="panel2"/></div></listView>
args结构如下:
function myRowCreate(sender, args) {args = {"event":{"childindex" : 1,"groupindex" : 2,"row":[{},{}]//数组,每一数组项是一个JSON,包含了控件,如:{"controlid" : "label0", "color" : "#0000FF", "value" : "绿"}}}
2、在onitemcreate事件中对itemsource属性赋值,实现对行内控件赋值*
说明:onitemcreate事件中,对itemsource赋值时
//1、修改指定组的指定行内控件-------分组列表改行$id("listviewdefine0").initListChildItem({"groupindex" : groupindex, //指定的分组的索引号"childindex" : childindex, //当前的child行的索引号"row" : [{"controlid" : "label20","visible" : "true","color" : "#e3e3e3"//还可以增加类似上述的其他dsl属性key-value值}]})//2、修改指定组内控件-------分组列表改组$id("listviewdefine0").initListGroupItem({"groupindex" : groupindex, //指定的分组的索引号"row" : [{"controlid" : "label20","visible" : "true","color" : "#e3e3e3"//还可以增加类似上述的其他dsl属性key-value值}]})//3、修改指定行内控件--------普通行列表改行$id("listviewdefine0").initListChildItem({"childindex" : 1, //当前的child行的索引号,从0开始"row" : [{"controlid" : "label0","visible" : "false","color" : "#e3e3e3"//还可以增加类似上述的其他dsl属性key-value值}]})
function create(sender, args) {$alert(args);args.event = $stringToJSON(args.event)if (args.event.childindex == 0) {// 您的代码逻辑}if (args.event.childindex == 1) {// 您的代码逻辑}}